That Terapin Awning
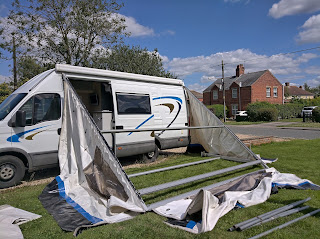
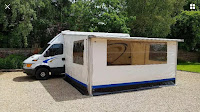
 The hawk eyed among you will have spotted a rather snazzy awning in some of my earlier photographs and; yes it did come with the van. Maybe it was time to throw it up and see if was all there or not.
Having recently tested the Fiammi awning at Cadwell park with the Honda VFR750 and Yamaha RD250 taking shelter underneath it, I thought it was high time I gave the proper awning a go. Well it was that or study so was a tough choice.
The awning is by Terapin who make awnings and gazebos for events and major motorsports teams around the world. Clearly most suitable for someone with my racing pedigree.
It is massive and I was not convinced that it was all there so a test pitch was well worth while. I spent bloody hours figuring it out (no instructions) but now I have it down I thought I would share a few stage photographs in part to help anyone else trying to tackle a pile of parts and to remind me next time I try to pitch this monster.
Process
First up lay everything out and identify the parts as best you can. Try to keep things out of the way of the build area and so they aren't on top of each other.
You can just about do this on your own but it is easier and safer with two. Otherwise make sure everyone stays out of the way as some of this stuff is quite heavy and there are stages where bits can fall.
The order can be critical in some places, in others you can do what is most comfortable for you. If something isn't working, try opening a door or taking a step back to see what is going on. Don't force anything, you might break something (most likely part of you).
Sometimes having a door open may help you out when sliding fabric into rails, other times it is easier with them closed.
Finally, when I am describing positions, I am giving them personified to the van as if you were sat in it driving. So the front of the tent is by the passenger door and the side is the long edge.
Now we are all on the same page, lets do this!

- First up: stick the skirt on the bottom rail of the van. This can be done at any time but is easiest to do now.
- The roof fabric needs sliding into vans rail with the handles on the outer upper edge.
- The front and back need sliding into vans rails with the windows outboard of the tent and curtains inside. This can be done at the top for now and finished later with a door open.
- Screw in the forward and aft roof rail supports onto van so the open edge faces down, if you do this earlier, the roof fabric can snag on it.
- Thread the forward roof rail (these are sided, hooks should face inboard of the tent) on to front and roof fabric at the same time from the outside towards the van with the eye end hole facing forward to aft.
- Pin forward roof rail to van and stick the R clip in the hole to stop the pin dropping out.
- Repeat this for the rear roof rail. You will need a ladder for this if you also lack vertical reach.
 |
| Pictured before I figured out the roof needed to go on first. |
- get the forward and aft legs (again sided) into the awning with the foot towards the van and pin them to their roof rails.
- Now is a good time to drop in the two roof cross members. Note the crazy angle required on one hook compared to the other.
- Thread the side roof rail onto the side fabric top. It only goes on one way and the "Terapin" badge on the end of the bar should be the right way up.
- Hook the side roof rail to front and back roof rails. I can't find a good time to do this bit, its a pain in the ass to do regardless as the roof fabric is in the way.
- Slide the roof side support onto the roof fabric so it is in the outer most slot on top of the box section. This will be tight to get the roof support rail into its slot but if you fit it on the inner slot, the forward/aft roof supports mechanism will cut into the roof fabric.
- Drop roof side support into bracket and tighten the forward/aft roof supports hex screws to clamp the roof side support.
- Raise the legs in steps, forward and aft till they are vertical and the fabric looks square.
- The legs can be extended by removing the pin and R clip and sliding the leg up if needed.
- Now you can open the zips either side of the legs and thread the front, back and side into the leg slots.
- Close the zips when in and and make sure everything is about square.
- You can now slide in the bottom tubes in as desired.
- The forward and aft ends take two tubes connected to one another then passed through the black tube towards the bottom of the fabric on the inside.
- One end of the tube hooks under the support on the leg and the other end goes to the elephants foot.
- press down on the tube to tension the fabric then tighten the grub screws on the two supports.
- The side takes the stupidly long one through the black tube and is secured the same way (but needs doing after the front and back).
- You may want to omit one of these tubes for access (the doors wont open with a big tube stuck in them). For the forward and aft sides, you can use just one tube and place the elephants foot in the gap so you can use the door and fabric maintain rigidity.
- Finally peg out the gazebo as desired, make a well earned brew, apologise to the family for all of your swearing and make amends with the dog.


Comments
Post a Comment