Comfort mods
After a evenings eBaying I had a weekend of work to do.
Last weekend had shown that everything works but is just a bit dated. With this in mind I had bought a small stack of stuff to do a basic service and upgrade some of the front end comfort features.
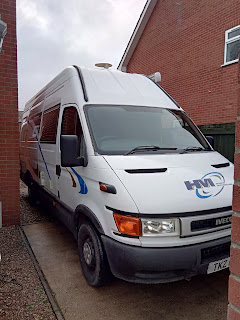
First on the cards I had to squeeze the van down the side of the house (a healthy 10mm clearance on the gates) to get to the hard standing to get the all important service out of the way.
The air filter looked new so that could stay. That left me some fresh Castorol Magnatech 10w40 and an oil filter to sort out. One nice feature of having a van that isn't lowered is that I could do the oil change without jacking the car up. I did stick a jack under the right drop leg so I could more easily get the Milwaukee M12 screwdriver in to save some effort with traditionally rusty looking screws on the belly pan.
The van only takes 6 ltrs of oil which surprised me but that aside it was about as interesting as an oil change can get. I didn't even get that much oil on the concrete as it drained out into the stiff breeze of one of the many February storms.
Wind deflectors
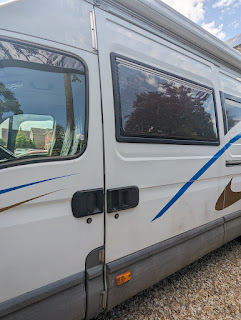
First off the window frames got a clean (with the window open duh) with a wipe then the wind deflectors just slot in. As they are a full deflector they do need a bit of bending to get into the frame which is a bit scary when the plastic is cold. Thankfully they were nice and flexible so didn't present a problem.
four metal clips (two per side) were then inserted into the top of the frame aperture behind the wind deflector with the barb facing inboard. These just needed a bit of a poke with a flat blade screwdriver to push them home then the window could be closed (gingerly) to hold the lot in place for the 24hrs prescribed by the instructions.

The fit is really good, improving the looks and should give the option of opening the windows without deafening yourself/getting a face full of whatever is spraying about outside.
In testing they could be opened an inch with only a little more noise than closed at 60mph. Amazing stuff!
I kind of wish I had tested the before and after noise now to see what the difference is.
One negative though, makes cleaning the window more difficult when washing the van. I can live with that.
Head unit
 |
| Basic but functional interior |
A big upgrade was the headunit. The one that came with the van was an older Alpine headunit with a CD player. The audio quality was surprisingly good but features were heavily lacking. Also I didn't like how the fascia surround didn't clip in properly leaving everything looking untidy.
I have previously looked for DAB and bluetooth in a headunit but with unlimited mobile data I have found myself streaming most things including radio. As such a headunit with good mobile connectivity would suffice. I also had no need for a CD player and with the headunits vertical orientation, it was at high risk of stuff falling into it so I would prefer not to have one.
After a bit of online research; I fancied an android auto headunit like the Alpine ILX-F903. The vertical slot for the headunit and low clearance to everything else in this odd shaped dash would make fitting this large screened unit tricky even with its generous move and tilt options. It is also very pricey so I went for a Pioneer SPH-10BT. At a 6th of the price it was very appealing. The idea of using your phone as the screen is a pretty efficient one which appealed to me too. I also didn't need to use the inbuilt phone holder if all didn't go to plan with clearances making it a flexible choice.
The old headunit was pulled out with the same extract tools as the new one (that was a happy accident), then the tabs were bent back on the cradle so it could be pulled out too.
Fitting the new unit was super easy with a plug and play patch lead included (never got that with VW!) and the only cable that needed running was the microphone for handsfree and voice commands. I ran this up the A2 pillar and over the steering column where there was plenty of room and ample cable for the job.
I did spot some extra wires slaved into the old patch lead hinting at some other speakers hidden somewhere. Some later investigation found them terminating in units at the rear of the van where a previous owner had clearly thought of sticking some extra audio in the back. I tucked these away for now as I may end up using them for this job but will use the audio out provided by the headunit rather than attacking the new patch lead with a soldering iron and sticky tape.
The fascia plate was snapped into place, cradle extracted then the face plate put onto the head unit.
 Space was limited for the cradle but it didn't obscure anything important and once all connected it looks the business.
Pioneers app was installed on my Lenovo K10 Power (mid range android phone about a year old) which handled the app fine. When the ignition is turned on, the phone instantly loads the app giving you a four button display for your various audio settings. Corresponding hard buttons on the headunit offer a far less illegal way of doing the same thing even if the pragmatists among us see the phone as just another touch screen on a vehicle dashboard. The phone can then be used for more detailed inputs, and offer a big display of whatever it is you are looking at such as satnav or even YouTube when you are parked up. I haven't plaid with it a lot yet but so far it seems well designed and pretty intuitive. I do like the animated backgrounds which flow into the headunits LED's, tieing the whole experience together.
Seat covers
 |
| T5 Seat covers |
The drivers seat is a bit of a pig for access unless you are dust or horse hair as that seems to get in all of the seats corners just fine. I used a thin screwdriver to poke the elastic loops between the cushion and seat base where I would put a hook on the end and then hook it up to the seats frame with a fair bit of tension. gradually the seat pulled tight working from the top to bottom. A fair bit of seat re-positioning later and the easy one was done.
 |
| Daily seat covers |

Frustratingly the seat covers didn't come with enough hooks so I wire locked the rest of the loops in place.
By taking my time I got a half decent fit out of these covers. At least as good as the advert anyway. With the headrests made of foam as they are, they will always look a bit baggy on top. I might consider padding these out in the future and refitting if I don't find a better cover but the end result is still a fair bit better than stained blue fabric.
A custom black carpet was also added to the passenger/driver floor. These are cheap and make things feel a bit plusher.
Steering wheel cover
I had a brief look for alternative steering wheels for the Iveco but there doesn't appear to be a "Highline" option or anything else like that. I didn't see anything about fitting later steering wheels either so, for now, I opted for a proper fitted steering wheel cover. When my mum got eyes on this, she quickly volunteered for this job as a break from knitting. She spent an hour or so wrestling with the cover on a loose steering wheel but she was finally victorious. The cover itself is about 5mm too narrow for the MkIII wheel despite advertising as fitting. I got round this by rotating the cover a bit to hide the gap behind the wheel more.
Where the spokes connect to the wheel, there is a large gap where the leather lifts slightly but a bit of rubber adhesive and a heavy lashing down with string whilst it dried cleaned this up.
The end result is a nice little boost to looks and feel for a little effort and a few quid. Nice.
 Dashcam/reversing camera mirror thing
I liked my integrated reversing camera on the T5 and the much longer Iveco needed one too. I shopped about a bit and settled on a combo where the display was hidden inside a rear view mirror with an included reversing camera and a bonus dash cam.
This was quite a big project in itself so I have separated it out.
This was quite a big project in itself so I have separated it out.


Comments
Post a Comment